Eye tracker
Table of contents
- What is eye tracker?
- The most important things
- Know the eye tracker computer
- Preparation tips
- Special tips for infant participants
- Calibrate eye tracker
- Eye-tracking skill checklist
- How to run an eye-tracking study
- Documents & Tutorials
- FAQs
What is eye tracker?
Eye tracker is a specialized camera system. It takes hundreds of pictures of participants eyes every second and translates these images into coordinates on the screen based on the the shape of the pupil and the position of reflection from the corneal.
Here is a great explanation of modern eye tracking from SR-Research About Eye Tracking
The most important things
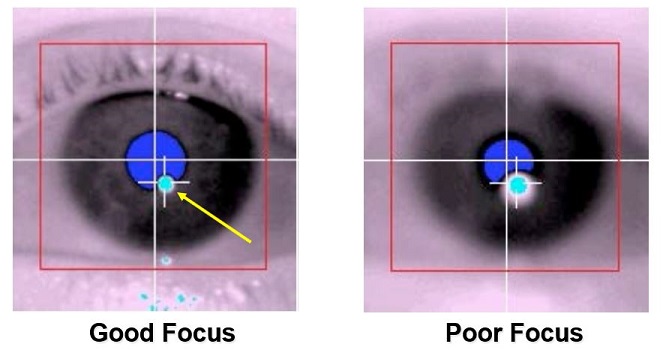
To achieve high-quality eye tracking, it requries high-quality eye images. Just like every camera system (e.g., the ones in your phone), having camera lens in focus is the most important thing. However, eye tracking system does NOT (and should not) have auto-focus functions that we are used to on our phones, keeping participants’ eyes in focus depends on a few factors:
- whether their distance to the screen is optimal
- whether they are siting within the tracking area of the camera
- whether they are facing the camera with opening eyes
Luckily, you can read all of the information from the eye tracker screen.

Always remember that your participants are unlikely to know how eye tracker works or what are the key factors to ensure good tracking.
As an experimenter, you should be explicit about the things participants should pay attention, and remind them whenever necessary.
When it comes to infant / child studies, you need to communicate the key factors above to the parents who are holding their kids in front of the screen. Let parents help you to achieve good tracking quality is very very important!
Know the eye tracker computer

Preparation tips
Initial setup
Things to check before starting the program for a study.
- Participants should sit comfortably in the chair
- Participants’ posture should be straight
- Participants should face the monitor. Their head should be at the centre of the tracking area.
- Check the distance, ideally between 500 to 700 mm. You can find the distance on the eye tracker screen
- There should be a stable detection of the target sticker and both eyes (i.e., no flicking)
- Check the volumes on the speaker to ensure it is not too loud or quiet.
Adjust eye image thresholds
To prperly translate eye images into looking coordinates, eye tracker relies on a set of thresholds to detect pupil and corneal reflection.
In most of cases, the eye tracker will automatically adjust the thresholds for pupil and corneal reflection detection. However, the automatic adjustment might not work sometimes. If this happens, you need to adjust the thresholds manually by pressing the adjustment keys.
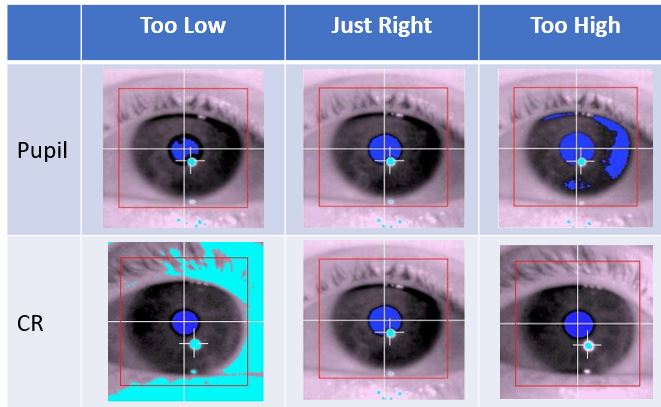
When the Pupil is properly thresholded (i.e., fully filled in blue with no additional blue in the iris), its threshold value should be at least 75. If lower than 75, the eye needs more illumination. The level of illumination can be adjusted via the Illuminator Power setting on the Camera Setup screen, and / or by moving the illuminator closer to the participant.
Once the illumination is adjusted, make sure the Corneal Reflection is properly thresholded (fully filled in light-blue with no additional thresholding in the sclera) without worrying too much about its threshold value, as long as it is below 255.

Special tips for infant participants
As evident from the previous discussion, setting up the eye tracker correctly requires a considerable amount of time. However, due to the limited attention span of infants, they may not provide enough time for a thorough eye tracker setup. To overcome these challenges and ensure a high-quality eye tracking experience with infant participants, the following tips are recommended:
- Calm down. It is absolutely normal for infants to get distracted at any point of a study.
- Setup eye tracker during the initial cartoon section. In our programs, we consistently incorporate a cartoon that plays at the start. The purpose of this cartoon is to assist infants in maintaining focus on the screen while minimizing excessive movement. This particular phase serves as a crucial window of opportunity for setting up the eye tracker accurately.
- Fast calibration / validation. Surprisingly, it is advisable to promptly confirm fixations during calibration, validation, and drift-correction. As soon as you observe a shift in their gaze to a new location, the confirmation of fixations should occur IMMEDIATELY. This is particularly important because infants tend to rapidly lose interest in a target that repeatedly appears at the same location. However, they are more likely to focus when the target appears in a new location. Therefore, their initial gazes following the shift in target location are typically the most accurate and ideal for calibration purposes. As a benchmark, it is recommended to complete a 5-point calibration within a time frame of 5 seconds.
Infants are unlikely to maintain their body position throughout the study. You, as an experimenter, should continuously monitor tracking status in your study. Specifically, you need to check the following items on the eye tracker screen (check the Preview area in the screenshot here):
- if they are facing the monitor
- if their eyes can be stably tracked
- if their heads are at the center of tracking area
- if the viewing distance stays with in 500 to 700 mm. If their viewing distance deviates much from the original distance, their eyes are likely become blurry.
If any of the situations occures, you can either ask the parents to adjust baby’s position (e.g., hold their baby) or adjust the monitor position accordingly. Again, calm down.
Calibrate eye tracker
Everyone’s eyes are unique, and so is the approach to predicting their gaze. In order to attain this objective, the eye tracker must be properly calibrated before accurate tracking can take place. Consequently, calibration, validation, and drift-correction stand as the most crucial procedures for ensuring the success of eye tracking studies.
Eye tracker operation shortcuts
When you’re at the eye tracker preparation screen (before experimental trials start).
- C for Calibration
- V for Validation
- Return for confirming looking during calibration, validation & drift-correction.
- O for starting experimental trials
Calibration
Let the machine knows how to translate eye images into gaze coordinates on the screen
- Both eyes should be tracked (i.e., there should be green and blue crosses on both eyes)
- When calibration starts, confirm fixation IMMEDIATELY AFTER the eyes move by pressing the Return key.
- Valid key pressing during calibration will make the target appears in another location
- Press again if a key pressing calibration is not valid
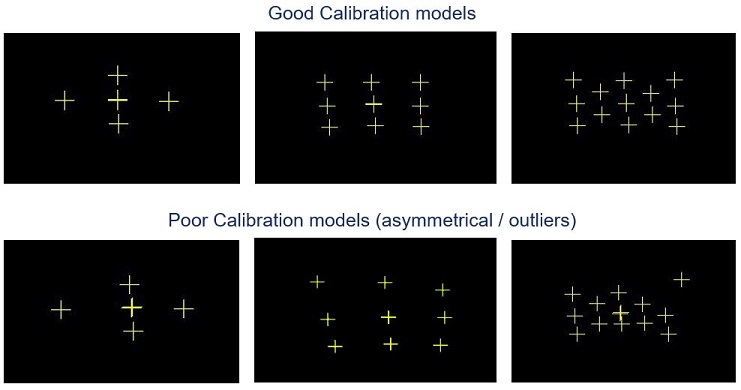
- At the end of calibration, the looking pattern indicated by the green and blue crosses should match the layout of calibration target on the screen. If not, restart the calibration.


Validation
Verifies the accuracy of calibration
-
Operates similarly to calibration
- Watch the size of error (indicated by the length of white lines) for each target location.
- The smaller the error the better.
- Both eyes should have GOOD results.
- If not, either redo the calibration (when participants looked very attentively during validation)
- Or redo the validation, if participants move their bodies during the validation

Drift Correction
Monitoring the tracking accuracy amid a study
- Operates similarly to calibration and validation
- Pressing the Return key to confirm participants’ looking
- An accurate drift correction will allow the study to continue
- If the error is too large (i.e., long white lines), we need to redo calibration & validation

Eye-tracking skill checklist
Go to this page to test your understanding of eye-tracking.
How to run an eye-tracking study
- Go to this page to learn a step-by-step guide.
Documents & Tutorials
A short video tutorial
FAQs
Still have questions about eye tracker? Check here to learn more.